Product updates
– 14 min read
How to build an embedded app with graph-based RAG

Sam Julien | September 5, 2024
In this blog post, you’ll learn how to build an embedded chat app using our graph-based RAG — Knowledge Graph (KG) — for data. You’ll learn how to set up a Knowledge Graph in Writer AI Studio, create a new graph, upload files with the KG API, and embed your app into another app using the WRITER Framework. Check out the code on GitHub.

If you’re reading this, you’re likely familiar with the power of combining no-code tools and APIs in AI apps. But let’s talk specifics: In the WRITER Framework, you can embed a no-code chat app that uses a Knowledge Graph (KG) — our graph-based RAG that’s designed to make your data more interactive and accessible. By combining a visual UI with backend coding, you can simplify the development process and make an app that can handle and present complex data relationships. It’s about creating a more intuitive experience, where your data works with you, not against you.
In this post, you’ll learn how to build and embed a no-code chat app within the WRITER Framework and integrate it with a Knowledge Graph (KG). We’ll explore how the KG API handles file uploads and how combining no-code tools with the WRITER Framework and API can improve your AI apps.
What’s a Knowledge Graph?
A Knowledge Graph (KG) is more than just a database. It’s a way of storing data that’s designed to map relationships between concepts, entities, and events. It’s like a network where all the information is connected by semantic metadata, creating a structure that’s similar to how we think and understand the world. This makes KGs really effective for apps like RAG-based search, where natural language queries need to flow seamlessly through data organized by meaning, not just raw facts.
The Writer KG has data connectors that link up different data sources, so that even the most different datasets can communicate. It also uses a special large language model (LLM) that can process data at the enterprise level, building meaningful relationships between dense and sparse data points. With its dynamic graph structure, the Writer KG updates as new data is added, handling complex and evolving information almost instantly. And with retrieval-aware compression, it condenses data without losing accuracy, so your queries remain effective.
If you’re building search engines, recommendation systems, or apps that need to understand complex data relationships, a KG can provide the backbone for smarter data processing. Whether you’re using the KG for natural language processing, customer data analysis, or content creation, being able to connect and query data efficiently makes KGs a superpower in your AI toolkit.
Why use a no-code platform?
No-code platforms have changed the way we build apps. If you need to get things done quickly, you can use no-code tools to build apps that’d otherwise require coding. The beauty of no-code is that it makes development accessible to everyone, allowing users to focus on functionality and user experience instead of trying to figure out the technical details.
Writer AI Studio takes this concept a step further by enabling fast development and iteration. It has an intuitive interface so you can quickly build and deploy apps, experiment with different features, and make adjustments on the fly. This fast development cycle is invaluable, especially when you need to adapt to changing requirements or test new ideas without the overhead of traditional coding.
In short, no-code tools like those found in Writer AI Studio help you bring ideas to life faster and more efficiently, regardless of your technical background.
How to set up the KG in Writer AI Studio
Writer AI Studio makes it easy to create and manage a KG and a chat app that uses the graph.
Let’s do this step-by-step:
1. Sign in to AI Studio. To get started, sign in to Writer AI Studio and select “Knowledge Graph” from the menu in the left column, which will take you to the Knowledge Graph page. This is where you’ll start building your KG.
2. Name your KG. Once you’re on the KG page, select “New Graph” and give your KG a name. Be sure to choose a name that clearly represents the data you’ll be working with. For example, if you’re creating a KG for product descriptions, you might call it the “Product Descriptions KG.”
3. Add a description. Once you’ve named your KG, give it a brief description. It’ll help you and your team members understand what it’s for. You might also include details about the type of data the KG will contain and the specific use cases it’ll support. For example, you might say something like, “This KG contains product descriptions and links to related things like ingredients and categories.”
4. Upload your data. Next, add your data to the KG by selecting “Add via manual file upload.” This will take you to a page with instructions to “Set up your graph by adding files.” Select the “adding files” link or the “Upload files” button near the upper right of the page and select the files you want to upload. These can be CSV files, JSON files, PDF files, or any other supported format. For example, you can upload product descriptions, customer records, or other datasets relevant to your project. After you upload your files, the system will index the data and store it in the Knowledge Graph. During this process, the system will automatically organize your data, connecting entities and relationships based on the information you’ve provided.
5. Copy your KG’s ID. You’ll need this information for the next step. The ID will be in your browser’s address bar — the long string of letters and numbers in the URL after graphId=. Copy it and paste it into a temporary document.
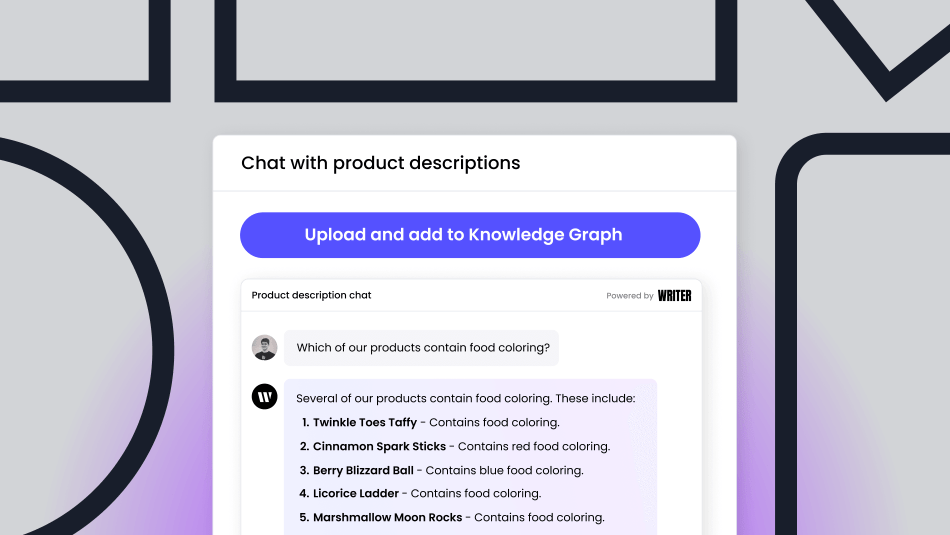
6. Create a no-code chat app. Once your data is uploaded and indexed, it’s ready for interaction. Select the “Build an app” button, and when the “Start building” menu appears, select “Chat app.” This will create a new no-code chat app, and you’ll be taken to its configuration page.
7. Configure the chat app to use the KG. On the configuration page, set the “General mode” switch to “off” position and the “Knowledge Graph mode” switch to “on”. From the options that appear, select “Always stay connected to a specific set of graphs” and from the “Graphs” menu, select the KG that you created earlier.
8. Try out your KG-powered chat app! Try entering questions in the “Preview your chat app” section on the right side of the page and see how the chat uses the information from your uploaded data to answer them.
9. Get the information the developer needs to embed the chat app into their app. Click on the “Deploy” menu item at the top of the page. Set the “Embed app” switch to the “on” position. Several items will appear, including a text field for the <iframe> tag for embedding the chat app into other web pages. Copy the embed URL from the tag’s src attribute and paste it into the same temporary document as you used for the Knowledge Graph’s ID.
API alternative
If you prefer a code-first approach, Writer AI Studio provides an API that allows you to programmatically create and manage KGs. This is especially useful if you want to integrate KG creation into your existing workflows, or if you need more customization and control than the UI provides. With the Writer KG API, you can define your KG, add data, and manage relationships between entities directly in code.
The API allows you to perform all basic operations, such as creating a new KG with specific attributes, uploading data files, and linking entities. You can also update and query your KG in real time, ensuring that your data remains dynamic and responsive. Whether you’re working with large datasets or want to automate KG management, the Writer Knowledge Graph API provides the flexibility and power you need to efficiently build and maintain your knowledge graphs.
You can also work directly with the API’s REST endpoints or access the API via the Python or Node SDKs.
For more details and code examples, check out the full API documentation here.
How to build a full-featured chat app in WRITER Framework
Let’s explore a scenario where a product manager has created a KG-powered no-code chat app and wants a full-featured app. With the WRITER Framework, they can hand their app to a developer, who can add it to a full-featured app using the WRITER Framework’s combination of drag-and-drop interface design and code.
Create a new WRITER Framework app
To start, create a new WRITER Framework app. Just follow these steps:
1. Create a new WRITER Framework app. Go to Writer AI Studio’s home page and select the “Build an app” button and then select “Framework” from the “Start Building” menu. Open a command-line interface and follow the instructions to set the environment variable, then create the app using the writer create app_name command, replacing app_name with a name of your choosing.
2. Open the WRITER Framework editor. In the command-line interface, enter writer edit app_name. The editor will launch and present a localhost URL. Open a browser to this URL.
3. Add the code for the app. Select “Code” from the menu near the top of the page to open the code editor. Replace the code in the editor with the code below (you can also copy the code from this GitHub page):
import writer as wf
import writer.ai
import time

# Replace your Knowledge Graph ID here
GRAPH_ID = "Your Knowledge Graph's ID here"

# Adjust this timeout and sleep time as needed to avoid spamming the API
MAX_TIMEOUT = 90
SLEEP_TIME = 0.6

# Load the files and let the user know
def handle_file_upload(state, payload):
    state["files"] = payload
    if (len(state["files"]) == 1):
        state["message"] = f'File {state["files"][0]["name"]} ready to upload.'
    else:
        state["message"] = f'{len(state["files"])} files ready to upload.'

# Upload and add file(s) to Knowledge Graph
def handle_add_to_graph(state):
    # Retrieve the graph
    graph = writer.ai.retrieve_graph(GRAPH_ID)
    current_completed = graph.file_status.completed
    new_completed = current_completed + len(state["files"])

    # Upload the files
    for file in state["files"]:
        state["message"] = f'% Kicking off upload of {file["name"]}...'
        uploaded_file = writer.ai.upload_file(data=file["data"], name=file["name"], type=file["type"])
        graph.add_file(uploaded_file)

    # Poll the graph until all files are indexed and marked as completed
    state["message"] = "% Processing and indexing files in Knowledge Graph..."
    start_time = time.time()
    while (time.time() - start_time) < MAX_TIMEOUT:
        try:
            updated_graph = writer.ai.retrieve_graph(GRAPH_ID)
            if updated_graph.file_status.completed == new_completed:
                state["message"] = "+ File(s) successfully added to graph."
                return True
        except Exception as e:
            print(f"Error occurred: {e}")
        time.sleep(SLEEP_TIME)
    state["message"] = "- Indexing timed out. Please try again."

# Initialize the state
wf.init_state({
    "my_app": {
        "title": "Chat with product descriptions"
    },
    "message": "",
    "files": []
})
4. Update the code with your Knowledge Graph’s ID. Set the value of the GRAPH_ID constant (located near the start of the code) to the graph ID value you copied when setting up the Knowledge Graph.
5. Save the changes you made. Select the “Save and run” button near the top of the code editor.
Now that you have a Framework app, it’s time to set up its user interface.
Build the user interface
Follow these steps to build the user interface:
1. Clear out the default user interface. Delete all the user interface components except for the Header.
2. Add a Section. From the Layout section of the Toolkit menu, drag a Section and place it below the Header.
3. Add and configure a Message component. This component will display confirmation messages when the user uploads files to the KG.
From the Content section of the Toolkit menu, drag a Message and place it inside the Section. Select the Message, then in the Properties sidebar that appears, do the following:
- Change the Message property to @{
message}. - Set the Visibility property to Custom and the Visibility value property to
message.
4. Add and configure a File Input component. This component will give the user the ability to select files to upload to the KG.
From the Input section of the Toolkit menu, drag a File Input and place it inside the Section below the Message. Select the File Input, then in the Properties sidebar that appears, do the following:
- Change the Label property to
Select filesfor the Knowledge Graph. - Set the Allow multiple files property to
yes. - Set the wf-file-change property to
handle_file_upload— this connects the File Input’s file selection action to thehandle_file_upload()function in the code, which adds the selected files to the list of files to upload.
5. Add and configure a Button component. This component will allow the user to upload and add the selected files to the KG.
From the Other section of the Toolkit menu, drag a Button and place it in the Section below the File Input. Select the Button, then in the Properties sidebar that appears, do the following:
- Change the Text property to
Add to graph. - Set the Icon property to
upload. - Set the wf-click property to
handle_add_to_graph— this connects the Button’s select action to thehandle_add_to_graph()function in the code, which uploads the selected files and adds them to the KG.
6. Add and configure an iframe component. This component will act as the container for the no-code chat app.
From the Embed section of the Toolkit menu, drag an iframe and place it in the Section below the Button. Select the iframe, then in the Properties sidebar that appears, do the following:
- Change its Source property to the embed URL value you copied when you created the KG and its no-code app.
If you’ve reached this point, you now have a KG-powered Framework app that builds on the original no-code chat app!
What will you build?
You’ve learned how to create and deploy a no-code chat app using Writer AI Studio, integrated with a Knowledge Graph. You’ve set up a KG within the WRITER Framework, handled file uploads via the KG API, and embedded the chat app into a Writer Framework app. And you now know the benefits of using no-code tools combined with API-driven features, offering flexibility for both non-technical users and developers.
Ready to get started? Use Writer AI Studio to build your own app and explore its advanced features! Check out the code on GitHub, the Knowledge Graph API guide, and the WRITER Framework documentation.
Feel free to reach out to me on X or LinkedIn and let me know what you’re building! 🚀
More resources
Product updates
– 6 min read
Simplify financial app development with the WRITER Framework and Palmyra Fin
Sam Julien